
Do you remember the days a horse was diagnosed “navicular”with a single nerve block and a set of X-rays? He was given a “guarded” prognosis as a performance horse, and a treatment plan that consisted of a pair of egg-bar shoes with wedge pads and a little bit of bute. Some of those “navicular” horses did quite well—while others were plagued by chronic lameness for the rest of their careers.
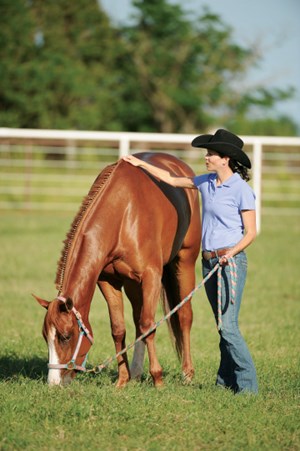 Basic, old-fashioned horse care, like rest and hand-grazing, can go a long way toward heading off or rehabbing injuries.
Times have changed. These days, the nerve blocks and X-rays are likely to be followed with an ultrasound exam, and maybe even an MRI. In fact, experts have identified 50 or more specific diagnoses for lameness arising from the heel area of the horse’s foot, and almost as many treatment options are available. Thousands of dollars later, you may have a specific diagnosis and a treatment plan, but guess what? Sometimes basic shoeing changes and some conservative use of medications, along with careful overall management, may still be the key to keeping your horse sound—regardless of the diagnosis.
In this article, I’ll review the value of good, old-fashioned horsemanship for keeping your horse sound. I’ll cover basic management techniques, and will offer strategies to help you prevent, detect, and treat soundness problems. I’ll explain the importance of basic diagnostics and help you make sure tried-and-true treatments don’t get overlooked in favor of new and exciting technology. Plus I’ll help you sort through some of the technologies that can help your vet diagnose and treat your horse’s lameness problem when you need to go beyond the basics.
Good, Old-Fashioned Horsemanship
Let’s start with a three-step, home-based plan to manage your horse’s soundness. If you can successfully follow this plan, you may never need high-tech diagnostics or expensive treatment because of a complex soundness issue.
The first step for any health concern is prevention. If you can manage your horse carefully and avoid injury altogether, you’ll always be ahead of the game. To prevent injury in your performance horse, pay attention to the following factors:
Conditioning: A fit horse is a strong horse—and he’s less likely to be injured. When planning your horse’s work schedule, set aside plenty of time for long, slow distance work, such as long walks, to help condition him, while minimizing stress. Include other types of work specific to your sport that target conditioning, rather than training hard every day.
Training schedule: Plan your horse’s work schedule to include hard work as well as lighter, less demanding sessions—and be willing to adjust according to how he feels. If he comes out one day feeling a little tired, give him a break. And, if he performs perfectly one day—it may be a time to quit while you’re ahead, even if you planned a harder training ride.
Foot care: Your hoof-care professional is the key to healthy feet. Find the best farrier or trimmer available, and treat him or her right. Shorter shoeing/trimming intervals are often the key to maintaining correct balance, which is critical for keeping your horse sound. During the summer months when your horse is working hard, you may need to schedule foot care as often as every four weeks.
Footing: Solid, even footing for your work sessions is critical. After all, it only takes one misstep to cause an injury. Make sure your daily rides are on well-maintained footing, suitable for your chosen discipline. If you’re a trail rider, select trails that are in good shape.
Leg protection: If your horse engages in a discipline where direct trauma is a risk (such as jumping), boots for his lower legs can provide needed protection. However, there’s now some belief that boots and bandages can actually increase the injury risk to tendons and ligaments in hardworking horses if they lead to increased temperatures in these soft tissue structures. So consider your horse’s situation carefully, and consult your vet when deciding what, if any, protective boots or bandages to use. And if you do decide to use them, make sure they fit properly.
Step 2: Detect
No matter how careful you are, you won’t be able to prevent the occasional bump, bruise, or strain—especially if your horse is a hard-working athlete. The key is early detection and preventing it from escalating to a more severe injury. To help detect problems in their earliest stages before they become significant, take the following steps:
Palpate:
Every day when you groom and tack up your horse, run your hands across his back and over all four legs. Know what’s normal, notice areas of increased heat or swelling, and pay attention if he seems sensitive or show signs of pain. If you do find something not quite right, don’t ignore it. Employ the basic treatment strategies outlined under Step 3 (below), until it returns to normal. If it persists, call your vet.
Observe:Watch your horse moving on a regular basis, and notice if his gait becomes stiff or irregular. Observe his movement on a longe line for a brief session once or twice a week. If he doesn’t longe, have someone walk and jog him in-hand so you can watch. If you detect a subtle stiffness or gait irregularity, address it now, before it escalates.
Feel: Pay close attention to how your horse “feels” when you ride. If you notice stiffness or unevenness in his gait, stop working him to avoid making it worse. Depending on your level of experience, you may be able to feel things long before they can be seen.
Monitor his attitude: Is your normally happy, willing athlete suddenly cranky? Before you push through his attitude, palpate, observe, and feel carefully for signs of injury. Consider giving him a short break from work to see if he improves. If his cranky attitude is because he’s sore, a little rest may be all he needs to feel better and avoid a more serious injury.
Step 3: Treat
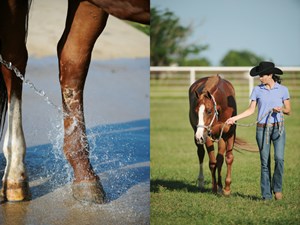 LEFT: Ice or cold-water hosing will decrease blood flow and minimize damage caused by inflammation. RIGHT: Controlled exercise, like hand-walking, is crucial to the healing process.
If you’re paying close attention, you’ll probably identify minor soreness or injuries from time-to-time. And when you do, you need a good, old-fashioned treatment plan.
Rest: If your horse is sore, the best thing you can do is give him a break. A couple of days out of work, or even light training days, may go a long way toward helping him feel better—and may even avoid a more serious injury. If your horse does experience a more acute lameness problem, rest is usually the key to successful healing.
Ice: Even an early, minor injury is generally accompanied by inflammation. Inflammation is caused by an increased blood flow to the area and the release of inflammatory enzymes that can be extremely damaging to tissues, making an injury even more significant. Ice or cold water applied to such an injury in its early stages will help decrease blood flow, and minimize the damaging effects of inflammation.
During rehabilitation from a serious injury, ice can expedite the healing process. Icing or cold-hosing an injured area after exercise sessions can help minimize inflammation that occurs following work and can keep healing on track.
Rehabilitate:Walk, walk, walk. With almost any injury, controlled exercise is a crucial component of a successful recovery. Hand walking, or even walking under saddle, will help your horse heal by encouraging proper alignment of tissues with minimal further damage.
Medicate: Like ice and cold-hosing, non-steroidal, anti-inflammatory medications, such as bute or flunixin meglumine (Banamine), can help minimize the damaging effects of inflammation. If you detect an early injury, judicious use of these medications can prevent it from becoming more severe. As a general rule of thumb, rest, ice, and anti-inflammatory medications for a period of three to five days can go a long way toward preventing mild stress and strain from developing into a more serious injury. If a subtle problem doesn’t improve in this amount of time, call your vet.
When He’s Really Lame
What happens when basic care doesn’t work? When your horse is really lame, your first effort should be to find out what’s wrong. This doesn’t mean you need to immediately run to the specialty hospital and request an MRI. In fact, an MRI may not even provide the necessary information to pinpoint your horse’s problem. While a specific diagnosis may require a number of different steps, it should always begin with a basic clinical examination.
Your vet will palpate your horse, watch him move, and perform a variety of different “stress tests” to identify the specific area causing him pain. Diagnostic blocks, where a local anesthetic is injected into the nerves, joints, or soft tissue structures can often identify the pain’s source.
If a specific cause can’t be found on the clinical exam, but the lameness has been localized to a certain area, your vet will need to take a look inside—and that’s where technology plays a role. A wide variety of high-tech imaging options have changed the face of lameness diagnosis. The following is a rundown of diagnostic tools now available—including limitations and cost estimates to help you understand when your horse needs what.
Digital Radiography
 Early detection, leading to a couple days off or stall rest, may help sidestep serious injury.
What it is: Similar to conventional radiography, this technology captures images by passing radiation through tissues to a detector, resulting in a black-and-white picture of the area involved. Digital technology provides instant results, as well as the ability to manipulate images to highlight certain structures.
What it tells you: Radiography is best for evaluating bone, and is the diagnostic tool of choice for fractures, arthritis, and other bone abnormalities. The greater detail available due to digital technology also provides a limited view of some soft-tissue structures.
Limitations: Because the technology is relatively new and provides greater detail and ability to manipulate images, it’s easy for your veterinarian to over-interpret findings. Radiography is very limited for soft-tissue evaluation.
Cost: $40 to $50 per view, $200 to $250 per joint.
Digital Ultrasound
What it is: Similar to conventional ultrasound, digital ultrasound captures images by passing sound waves through tissues to produce a picture. Because of the digital format, these ultrasound images can be manipulated to provide greater detail and alternative views, compared to conventional technology.
What it tells you: Ultrasound is primarily used to evaluate soft-tissue structures, although skilled practitioners can also evaluate some bone surfaces, including joints.
Limitations: Evaluation of soft-tissue structures within the foot are hampered by the presence of the hoof wall.
Cost: $150 to $400.
Nuclear Scintigraphy (Bone Scan)
What it is:Your horse is administered an intravenous dose of a radioactive substance which circulates throughout his bloodstream. A specialized camera is used to detect areas with inflammation.
What it tells you: A bone scan shows areas of active bone inflammation, and is especially useful for stress fractures that can’t be seen on radiographs, or for areas of bone/soft-tissue interface, such as a tendon attachment. When the radioactive substance’s presence is greater in soft tissue than bone, it can provide some information about soft-tissue injuries.
Limitations: A bone scan will give very limited information about most soft-tissue injuries. They’re more useful for acute injuries than chronic ones, where inflammation and increased blood flow is less pronounced. Bone scans don’t give a detailed picture of the structures in question; they’re primarily useful because of their sensitivity for detecting active inflammation.
Cost: $800 to $2,000, depending on the number of images obtained.
Magnetic Resonance Imaging
What it is: MRI is a diagnostic technique that produces a very detailed image of both bone and soft-tissue structures by way of a strong magnetic field that allows for detection of radio waves emitted from the body. MRI units are available for imaging your horse while sedated or standing, but better images can generally be obtained under anesthesia.
What it tells you: MRI provides a detailed picture of both soft tissues and bones. It’s most commonly used for imaging the lower legs and feet of horses, and can be especially useful for identifying injuries of the small soft-tissue structures within the foot.
Limitations: May require anesthesia to obtain the highest quality images. Interpretation is also difficult and requires an
experienced practitioner. Accuracy and significance of abnormalities detected on MRI images can sometimes be in question.
Cost: $1,000 to $2,500.
If you’re lucky, a thorough clinical exam will lead you through the maze of high-tech diagnostic options—and you’ll find an accurate diagnosis of your horse’s lameness. What’s next? Chances are, you’ll return to good, old-fashioned horsemanship as a crucial part of his recovery plan.
My Own Story
My favorite horse just came up lame. You know the one. He’s always a joy to be around. Soft and willing under saddle, talented at his job, and just as easy whether he was ridden yesterday or stood in his stall—forgotten due to a busy schedule. He’s the one I love to ride—every single day.
After the tears, came the basic diagnostic work up. Nerve blocks isolated the location of his lameness to the inside of the fetlock area, and an ultrasound revealed tearing of the inside branch of his suspensory ligament—an injury with a not-so-good prognosis for a performance horse. I could even see evidence of soft tissue swelling on his radiographs, and if I were honest with myself I’d admit that I had been watching a subtle swelling in that area for a while. In fact, he’d even felt a little “stiff” during my warm-up sessions before he really started limping.
I called my friend and colleague, Dr. Mark Revenaugh—a well-respected lameness expert in our area. “What do I do now?” I implored. “I love this horse. He can’t be broken.” Dr. Revenaugh tactfully averted his eyes as I stood blubbering in his office, and after looking over the ultrasound pictures I’d provided he made a simple suggestion. “I’d probably start with some good, old-fashioned horsemanship,” he said. “Stall rest, ice, and some anti-inflammatory therapy. Take a look at him in a week and you’ll have a better idea of how he’s going to heal.”
What? No shockwave therapy? No injections? Not one to question the wisdom of those from whom I seek advice, I trundled home to put my horse in a stall, give him some bute, and put in my icing time. Ten days later, the soft tissue swelling was noticeably diminished and even more importantly—he was trotting sound.
I called Dr. Revenaugh again. “He’s sound,” I gasped, “Now what? I want to do whatever I can to bring this horse back.”
“You should probably take another look,” he advised, “but I don’t know that I’d
recommend anything more aggressive unless you see a reason.” I kept icing. Thirty days later, the ultrasound picture looked significantly improved. I strapped on my running shoes and started walking, then running alongside him for minutes at a time. Three months later, he’s still trotting sound, I’m more fit, and the future is looking bright.
I’m thrilled with my decision to treat my horse with the basics, even when every hight-tech treatment option available is at my fingertips. The only thing I regret is that I didn’t pay a little closer attention when I first started to detect the soft-tissue swelling on his ankle, or when I felt (but didn’t want to admit) the subtle irregularity in his warm-up. Next time, I’ll be better. I’ve really learned the value of “good, old-fashioned horsemanship.”


