Fresh grass is at least 80% water, while cut grass dried and baled as horse hay is usually 10% or less water. This difference is why even horses with poor teeth can usually hold their own on good pasture. Wet horse hay simply easier to chew.
While hay is a more concentrated source of calories, pound per pound, than grass, many horses keep their weight easier on good grass, in part due to the high water content in grass. To effectively ferment the digestible fiber portion of plants, the microorganisms in the gut require a large amount of water.
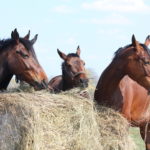
High water content is also the reason why chokes and impactions are almost nonexistent in horses on pasture. The necessary moisture for easy passage is built right into the grass.
When horses graze, you’ll notice they do not eat the grass down close to ground level (unless they’re really hungry because of insufficient grass to eat). If they do happen to pull up a whole plant, they will drop the lower portion and the dirt-covered roots from their mouth. Horses are not meant to get their minerals by eating dirt. Plants selectively filter minerals from the soil, and the mineral content of the grass is not the same as dirt.
In the process of drying and baling hay, a considerable amount of dirt may be incorporated into the bales. This can reduce the hay’s palatability, cause puffs of dust when eating that irritate the lungs and can even cause imbalanced intake of minerals, particularly with high levels of iron, aluminum and manganese. But you can offset some of these disadvantages by soaking hay before feeding it to your horse.
Reasons to Soak
- Help prevent choke.
- Help prevent impactions.
- Make hay easier to chew and digest.
- Reduce free-floating mold spores, dust, sugar and potassium in hay.
- Remove surface dirt.
Soaking hay can also benefit specific medical conditions. Many respiratory allergies in horses are from fungal/mold elements that grow in hay. Soaking does not completely remove these, but it does largely eliminate the possibility of spores being directly inhaled as small, airborne particles.
Quarter Horses with HYPP (hyperkalemic periodic paralysis) do best when there is not excessive potassium in their diets. Since all hays are high in potassium, this can be a problem. However, potassium leaches out of hays easily when they are soaked. Soaking can reduce potassium by around 50%.
Horses and ponies with insulin resistance and weight/laminitis problems are very sensitive to the sugar content of their diet, even the amount of sugar in a grass hay. Soaking the hay can reduce the sugar up to 30%. However, when soaked to remove potassium or sugar, mature hays will show less of a reduction because the hay’s outer covering is more impervious to water. If you are soaking to remove sugar or potassium, it’s wise to soak a sample of hay, then allow part of it to dry completely and have the dried sample retested for sugar or potassium to make sure it really is as low as you hoped.
Soaking Hay Cubes and Pellets
Hay cubes and pellets are much less likely to contain mold/fungi because of the way the hay is cut at higher moisture level and then more thoroughly heat-dried. However, cubes and pellets are like hay in every other way, and if any of the reasons for soaking hay apply to your horse, you should also consider soaking pellets or cubes.
Because they are so compact, less space is needed for the soaking. Regular-size water buckets or feed troughs will do. The compactness of cubes and pellets does mean longer soaking times, so allow a minimum of two hours. If reducing sugar or potassium is your goal, be sure to stir the mixture thoroughly after soaking and give it a good final rinse.
Since cubes and pellets will fall apart into tiny particles and make a mash, draining the water off the bottom of the container isn’t an option because you’ll lose the hay with the drainage water. Find a large colander with a fine mesh that will fit down inside the bucket snugly. Put the cubes or pellets into the container, and put the colander into the container over the hay. Weight the colander down with a small brick or rock and allow water to run freely through the colander and down into the hay particles. Do not compact the soaked hay too tightly or the water will simply run over the surface layer and back out again. A five- to 10-minute final rinse will do it. Then, holding the colander in place, tip the bucket to remove excess water on top of the hay.
The soaked cubes/pellets are also much heavier than their original weight, so unless your arms are up to the job, you’ll want a transportation system. Putting the bucket on a small dolly, with a strap to secure it in place, works well. You can also use the dolly to tilt the bucket for drainage. Simply wheel to your feeding area and remove the soaked hay with a scoop.
How Much Water
Most horses really enjoy soaked hay, but some miss the sugar that soaking removes. If you are only soaking to help chewing and digestion, fluff the hay slightly and soak in just enough water to cover it with the hay packed tightly into the soaking container. This will ensure that more water gets soaked into the hay. There will be little or no excess water remaining after soaking, so the sugar will stay with the hay.
When soaking to remove surface dirt and mold spores, it’s wise to fluff the hay slightly and rinse it very thoroughly before you begin. This carries away most of the dirt and surface mold in the initial rinse so that it does not soak back onto the hay’s surface. A relative short soak, but with agitation of the hay a few times during soaking, will then remove additional dirt and mold.
Soaking to leach out sugar or potassium should also be done after fluffing the hay, but requires longer soaking times for best effect. A minimum of one hour in cold water or a half-hour in hot water is best. The more water in the soaking container, the more efficient the sugar and potassium removal will be. However, when soaking in hot weather, you can get bacterial overgrowth very rapidly, so in those cases don’t soak longer than two hours.
How to Do It
The first thing you’ll find out is that soaked hay is heavy. Another problem is that it floats. Yet another is how and where to get rid of the water.
The first step is to pick a spot for your soaking station. A wash stall with a drain is ideal. If this isn’t available, you’ll need a spot outside where you can let the water run off without creating muddy spots in your paddocks or walkways. If you can find a spot protected from the weather, this makes life a lot easier.
You want to position your soaking container on either concrete with a drain, concrete with a slight slope so that water runs off freely or up on a wooden skid. (Many businesses give these away for free – try a lumberyard or home improvement store.) Your spot also needs to be within easy reach of a hose.
Next, consider the soaking container. Oversized muck buckets are a good choice. A water trough or old bathtub also works well. Ideally, your container will have a bottom or side plug for draining the water. If it doesn’t, it’s well worth it to find a large plug at a home improvement store, hardware, Wal-Mart or plumbing outlet and cut a hole in your container to match. You’ll also need a few bricks or a small concrete block to hold the hay down under water level.
Now that you have your spot set up, you’ll need a few items to make the hauling and lifting easy because the soaked hay will be very heavy. The best approach is to put a serving of hay into a nylon hay net or a collapsible laundry bag with holes poked in the bottom and run a length of strong rope or a lunge line over a beam above the soak tub or through a heavy ring attached to the ceiling or nearby wall. This creates a pulley system that makes it much easier to lift the soaked hay out of the tank. Either put a heavy snap or hook on the rope to attach to the hay bag or laundry sack, or tie a knot. (Snaps and hooks obviously are easier.)
Once you’ve soaked the hay, pull it up above water level and allow the excess water to drip off. Lower the hay into a wheelbarrow to transport it. Placing another pulley system in the feeding area makes for easy unloading.